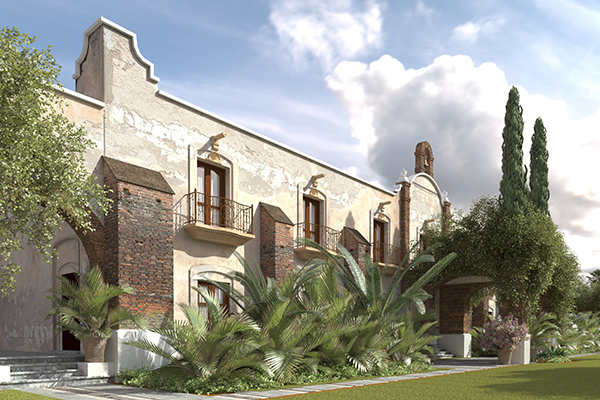
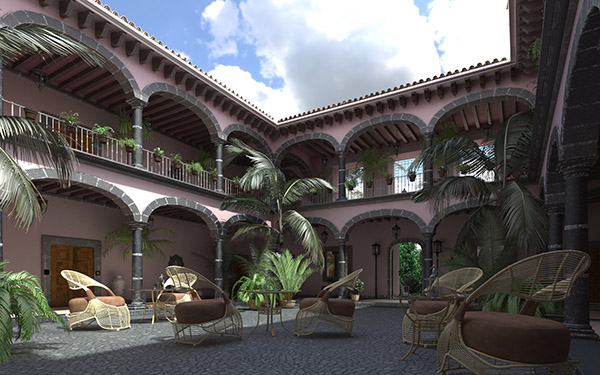
In this tutorial we are going to cover step by step the process of taking a 3dsmax scene, exporting it in .fbx, and rendering it using FluidRay RT. The following are a couple of examples of the results achieved. The original scenes were taken from Evermotion Archexteriors collection and originally came as 3dsmax scenes with textures, materials and cameras setup for VRay. Note that this tutorial applies to all 3dsmax scenes, not only those setup in VRay.
Scene Preparation
Before exporting, we need to make sure that the scene is setup correctly, so that most of the information is retained in the process. There are a few things that need special attention, in particular:
- XRefObjects proxies (we want the full resolution mesh exported)
- Objects that are not part of the standard 3dsmax installation (such as VRayCamera, VRayMaterial, VRayProxy) and for this reason are not handled by the standard 3dsmax exporter
- Complex texture networks that are not supported by the export format
For XRefObjects, make sure to uncheck the “Enable/Use local” checkbox, so that the full resolution mesh is used (see screenshot).

For VRay objects, we need to convert them to standard 3dsmax equivalents, so that they can be properly exported.
For textures, there are some nodes that are not handled by the exporter, such as color correction nodes or texture mixing nodes. In those situations, we need to remove the color correction nodes and connect the bitmap textures directly to the material.
We provide a Maxscript that does all this work automatically. Right before exporting, load the script in the Maxscript editor and press Ctrl+E to execute the script. You can get the script in the Addons Page.
Exporting
We are going to use the Autodesk .FBX format to export the scene to FluidRay RT. In the FBX exporter options, make sure that the to select “Preserve Instances”, “Y-Up”, “Binary” (see screenshot).

The “Preserve Instances” options allows to keep instanced geometry as it is in 3dsmax, instead of duplicating the mesh information an wasting a lot of memory. FluidRay RT will then preserve the instanced geometry as well.
The “Y-Up” option converts the axis orientation from the “Z-Up” 3dsmax convention to FluidRay RT‘s “Y-Up” convention.
The “Binary” option is suggested to keep the exported files to a manageable size.
Importing
Just start FluidRay RT, then go to File->Import and select the exported .fbx file.
Tweaking the scene in FluidRay RT
There are a few things that need to be adjusted to get the best results: Bump Mapping, Organic Materials and Cameras.
Bump Mapping – The bump mapping texture is exported correctly, but the amount of bump needs to be adjusted. Select the material, then in the Displacement section adjust the “Amount” parameter until it’s visually satisfying. You can use the browser preview to make the process easier.
Organic Materials (Leaves, Flowers and Plants) – The exported material is not the best suited for plants. To achieve the best result, we need to change the standard scattering of the material to “Glossy Diffuse Translucent”. In order to do that, select the material, then, in the Graph Editor, right click on the scattering input of the material and click on Connect to a new -> Glossy Diffuse Translucent. If the original scattering had a texture attached to the diffuse input, you need to connect the texture to both the Diffuse input and Transparency input of the Glossy Diffuse Translucent node. You also probably want to increase the Roughness parameter to 0.1. 
Cameras – The camera position and orientation is exported, but, due to some limitation in the .fbx import library, you will need to adjust the FOV and Camera Shift/Camera Tilt if present.
Conclusions
We shown the process of converting a 3dsmax scene to FluidRay RT. The process is pretty straightforward and normally doesn’t require much tweaking. Once you get the hang of it, it should take no more that 20-30 minutes to have a fairly complex scene ready to render in FluidRay.
If you want a more in-depth knowledge about FluidRay RT, check out the Help Page.
Also, if you have further questions, fell free to post on the Discussion Forum.

Weekly Rendering Roundup 07262015
/in 3D Rendering, NewsHere’s some cool things we saw, read and heard online this week.
(Unofficial) 3D render of Stamford Bridge – HT SBNation
If you’re a Chelsea fan, then you’ve probably already seen this rendering video since it was everywhere in the Chelsea-verse this week.
Thanks to Neil Vano for creating this.
Digital Watercolor Painted in Photoshop by Thanet Chanasakul – SketchUpArtists.org
Experienced architectural illustrator, Thanet Chanasakul, gives us an awesome 17-step tutorial on rendering watercolor images in PhotoShop. The final work is vibrant and something you’d be happy hanging on a wall. The tutorial is detailed enough to help you create your own work, but still accessible for anyone with a basic knowledge of PhotoShop.
8 Minute Eminem Freestyle – Sway’s Morning Show
Slim Shady dropped by Sway’s radio show and dropped an 8 minute freestyle that touched on enough pop culture to qualify as a TMZ post. Good to know he’s till got it.
Weekly Rendering Roundup 07092015
/in 3D Rendering, NewsGood or bad, we’re always online and we spend a lot of time looking at 3D rendering-related content from around the web. Of course, we also look at cat videos and the other weirdness that’s out there.
Here’s some things we liked this week:
Making of Meadow Mountain – ronenbekerman.com
Ronen gives 3D artist Dominic Maslik a chance to shine by walking us through his process for building the beautiful Meadow Mountain render. I really like this because he starts with some discussion of his preparation before going into modeling, lighting, camera setup and more. It’s a concise, easy-to-follow but deep explanation of how he gets such beautiful renders. Sadly, he didn’t do this in FluidRay, but you still have to appreciate the work and Dominic’s care in explaining his process.
Checkout this video timelapse to get a better idea of his work, then read the article.
Windows 10 v Windows 8 Performance Benchmarks – pcworld.com
Here’s a good read for anyone planning to take advantage of the free Windows 10 upgrade later this month. Gordon Mah Ung at PC World ran the new OS through performance testing against Windows 8, and shares his findings. Oddly, Gordon didn’t see much a difference between the two operating systems. I (and he) think we should wait before making any declarations, but it’s interesting to see some data.
Gamers should check out the section where he looks at Tomb Raider & BioShock: Infinite performance. In the gaming tests, Windows 10 did outperform Windows 8 by a bit.
SWTOR: Sith Lord Kallig’s 3D Printed Helmet – 3dprint.com
What happens when a gamer, avid cosplayer and talented designer gets excited?
This happens:
RuthlessFX loved Kalling from the popular MMO game so much that he built a real-live version of his helmet. The modeling was done in 3ds Max, and printed using a MakerBot Replicator 2. Checkout the article on 3D Print to see more images of the models and final product.
Featured image from 3Dprint.com
Jewelry Designs by Manuel Angel Piñeiro Solsona
/in Jewelry DesignCheck out some Jewelry designs by Manuel Angel Piñeiro Solsona, rendered in FluidRay RT.
FluidRay RT 1.1.5 Released
/in Software ReleasesWe just released FluidRay RT 1.1.5, you can try it here.
This version brings a ton of exciting new features, focusing both on usability and performance:
3dsMax to FluidRay step by step for easier rendering
/in Plugins-IntegrationsIn this tutorial we are going to cover step by step the process of taking a 3dsmax scene, exporting it in .fbx, and rendering it using FluidRay RT. The following are a couple of examples of the results achieved. The original scenes were taken from Evermotion Archexteriors collection and originally came as 3dsmax scenes with textures, materials and cameras setup for VRay. Note that this tutorial applies to all 3dsmax scenes, not only those setup in VRay.
Scene Preparation
Before exporting, we need to make sure that the scene is setup correctly, so that most of the information is retained in the process. There are a few things that need special attention, in particular:
For XRefObjects, make sure to uncheck the “Enable/Use local” checkbox, so that the full resolution mesh is used (see screenshot).
For VRay objects, we need to convert them to standard 3dsmax equivalents, so that they can be properly exported.
For textures, there are some nodes that are not handled by the exporter, such as color correction nodes or texture mixing nodes. In those situations, we need to remove the color correction nodes and connect the bitmap textures directly to the material.
We provide a Maxscript that does all this work automatically. Right before exporting, load the script in the Maxscript editor and press Ctrl+E to execute the script. You can get the script in the Addons Page.
Exporting
We are going to use the Autodesk .FBX format to export the scene to FluidRay RT. In the FBX exporter options, make sure that the to select “Preserve Instances”, “Y-Up”, “Binary” (see screenshot).
The “Preserve Instances” options allows to keep instanced geometry as it is in 3dsmax, instead of duplicating the mesh information an wasting a lot of memory. FluidRay RT will then preserve the instanced geometry as well.
The “Y-Up” option converts the axis orientation from the “Z-Up” 3dsmax convention to FluidRay RT‘s “Y-Up” convention.
The “Binary” option is suggested to keep the exported files to a manageable size.
Importing
Just start FluidRay RT, then go to File->Import and select the exported .fbx file.
Tweaking the scene in FluidRay RT
There are a few things that need to be adjusted to get the best results: Bump Mapping, Organic Materials and Cameras.
Bump Mapping – The bump mapping texture is exported correctly, but the amount of bump needs to be adjusted. Select the material, then in the Displacement section adjust the “Amount” parameter until it’s visually satisfying. You can use the browser preview to make the process easier.
Organic Materials (Leaves, Flowers and Plants) – The exported material is not the best suited for plants. To achieve the best result, we need to change the standard scattering of the material to “Glossy Diffuse Translucent”. In order to do that, select the material, then, in the Graph Editor, right click on the scattering input of the material and click on Connect to a new -> Glossy Diffuse Translucent. If the original scattering had a texture attached to the diffuse input, you need to connect the texture to both the Diffuse input and Transparency input of the Glossy Diffuse Translucent node. You also probably want to increase the Roughness parameter to 0.1.
Cameras – The camera position and orientation is exported, but, due to some limitation in the .fbx import library, you will need to adjust the FOV and Camera Shift/Camera Tilt if present.
Conclusions
We shown the process of converting a 3dsmax scene to FluidRay RT. The process is pretty straightforward and normally doesn’t require much tweaking. Once you get the hang of it, it should take no more that 20-30 minutes to have a fairly complex scene ready to render in FluidRay.
If you want a more in-depth knowledge about FluidRay RT, check out the Help Page.
Also, if you have further questions, fell free to post on the Discussion Forum.
MaxScript to prepare for exporting to FluidRay
/in MiscThis Maxscript for 3dSMax prepares the scene for better exporting to FluidRay RT. In particular, this script:
Right before exporting, load the script in the Maxscript editor and press Ctrl+E to execute the script.
The export format that provides the best results is .fbx.
Get this script in the Addons Page.
Introducing FluidRay RT v1.1.4
/in 3D Rendering, News, Software ReleasesIntroducing the New FluidRay.com
/in 3D Rendering, News, Software ReleasesYou might have noticed that things have been quiet on the site for the last few weeks. That’s because we’ve been working around the clock to get the new FluidRay.com up and running.
We’re proud to introduce to the new, more visual, mobile-friendly site. It’s taken the team several weeks (with a lot of long nights) to get it live.
Why Build a New Site?
We built the original site with a focus on delivering the software. Things like design and user-experience weren’t top of mind, and we didn’t spend a lot of time on how the site looked or how people would navigate. Yes, that was a big mistake.
Having had the site up for about a year, we were able to look at our site analytics and see some issues. We also realized that the site didn’t really match up to the software we’d built: 3D rendering is all about the visuals, so we need a site with the same emphasis.
We also thought about things like file management, caching, publishing tools, checkout and ease of maintenance — all the things that go into a keeping a site fresh, secure and growing.
What You’ll See on The New Site?
We’re still adding content and improving the visuals, but you’ll notice a few things right away:
We took a lot of information, grouped it logically and then created a better way to navigate through instead of scrolling. This is something we’ll continue to work on, so that people don’t get distracted or dissuaded by the site content.
What’s Next for The Site?
We don’t plan to ever be “done” with the new site. In the next few weeks, you’ll see new content including updated/upgraded renderings, improved videos and articles written by experience designers. We’re also working on a new shopping cart…and a few goodies that I can’t talk about yet.
Our goal is to keep making the site more useful to existing customers, demo users , designers, enthusiasts and anyone else visiting us.
It’s Always a Work in Progress
We think the new site is a HUGE leap forward from what we had before. And we’re confident that we’re on the right track. But there is still a lot to do and we have to make sure we aren’t falling behind the needs of our customers or the opportunities of web tech.
We hope you like the new site and that you’ll tell us if you don’t. Please leave a comment or visit the forums to tell us what you think about the new design and functionality.
Happy Rendering!
Goodies from Eurographics 2014
/in 3D RenderingThe 2015 Eurographics conference is only a few months away. It’s where some really talented people come together to look at the science and the art of computer graphics including modeling and rendering. Here are some videos from 2014 presentations that you might find interesting. It’s pretty cool to see what people are working on. […]
Eurographics Presentations for Learning Advanced Modeling
/in 3D RenderingIf you’re passionate about design, modeling and rendering then you know that there is always something new going on with technology and techniques. Sometimes you can take online courses or get into a classroom; but often you need to pickup new ideas and skills from less formal training.
Eurographics is the conference of the European Association for Computer Graphics. Researchers, students, practitioners and programmers come together every year to discuss new techniques, applications and ideas.
Here are some videos from Eurographics 2012 & 2013 that show how much the space has evolved, but also shows some ways that you can leverage features of FluidRay RT — like Volumetrics and Instancer Nodes — to take your rendering to the next level.
Some of the stuff in these videos is purely theoretical. You might see these features and applications in software releases down the line, but they are strictly academic right now. That said, a lot of what’s done here can be adapted to your animations and renderings with a little ingenuity.
I hope these videos give you some ideas for the future. Checkout out our Eurographics playlist on YouTube for more videos.